Toyota CH-R Service Manual: Reassembly
REASSEMBLY
PROCEDURE
1. TEMPORARILY TIGHTEN REAR DISC BRAKE BLEEDER PLUG
(a) Temporarily install the rear disc brake bleeder plug to the rear disc brake cylinder assembly.
HINT:
Fully tighten the rear disc brake bleeder plug after bleeding the system.
2. INSTALL REAR DISC BRAKE BLEEDER PLUG CAP
(a) Install the rear disc brake bleeder plug cap to the rear disc brake bleeder plug.
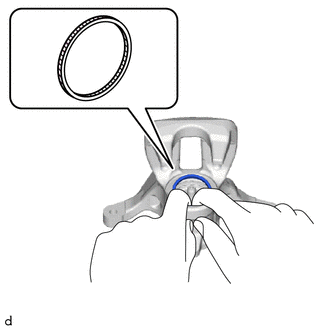
3. INSTALL PISTON SEAL
(a) Apply lithium soap base glycol grease to the entire circumference of a new piston seal.
.png)
|
Lithium Soap Base Glycol Grease |
(b) Install the piston seal to the rear disc brake cylinder assembly.
NOTICE:
- Do not damage the inner surface or piston seal groove of the rear disc brake cylinder.
- Do not allow the nut to rotate. If the nut is accidentally allowed to rotate, return it to its original position.
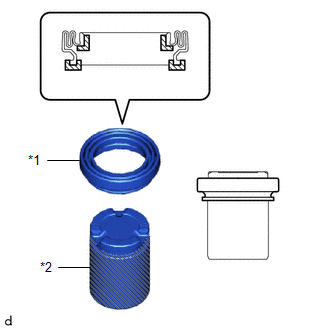
4. INSTALL REAR DISC BRAKE PISTON
(a) Apply a light layer of lithium soap base glycol grease to the entire circumference of a new cylinder boot.
|
*1 |
Cylinder Boot |
|
*2 |
Rear Disc Brake Piston |
|
|
Lithium Soap Base Glycol Grease |
(b) Apply a light layer of lithium soap base glycol grease to the contact surfaces of the rear disc brake piston.
(c) Install the cylinder boot to the rear disc brake piston.
|
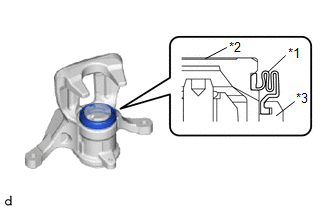
(d) Install the seal portion of the cylinder boot into the groove portion of the rear disc brake cylinder. NOTICE: Securely install the cylinder boot to the groove of the rear disc brake cylinder. |
|
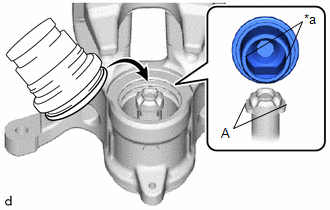
(e) Install the rear disc brake piston to the rear disc brake cylinder assembly.
NOTICE:
- Install the rear disc brake cylinder LH so that its portions marked (A) fit into the indentations of the rear disc brake piston.
- Do not forcibly install the rear disc brake piston into the rear disc brake cylinder assembly.
(f) Install the rear disc brake piston to the rear disc brake cylinder assembly.
|
(g) Make sure that the cylinder boot is securely installed into the groove of the rear disc brake cylinder and rear disc brake piston. |
|
 Inspection
INSPECTION
PROCEDURE
1. INSPECT PAD LINING THICKNESS
(a) Using a ruler, measure the rear disc brake pad lining thickness.
Standard Thickness:
9.5 mm (0.374 in.)
Minimum Thickne ...
 Installation
INSTALLATION
CAUTION / NOTICE / HINT
HINT:
Use the same procedure for the RH side and LH side.
The following procedure is for the LH side.
PROCEDURE
1. INSTALL REAR DISC
...
Other materials:
Toyota CH-R Service Manual > Tire Pressure Warning System: Registration
REGISTRATION
PROCEDURE
1. BEFORE REGISTRATION
NOTICE:
The transmitter ID is written on the tire pressure warning valve and transmitter.
It is not possible to read the transmitter ID after installing the tire onto the
wheel. Therefore, make a note of the transmitter ID before installing the t ...
Toyota CH-R Service Manual > Side Airbag Sensor(for Center Pillar): On-vehicle Inspection
ON-VEHICLE INSPECTION
CAUTION / NOTICE / HINT
CAUTION:
Be sure to correctly follow the removal and installation procedures for the side
airbag sensors.
PROCEDURE
1. INSPECT SIDE AIRBAG SENSOR (for Vehicle not Involved in Collision)
(a) Perform a diagnostic system check.
Click here
2. INS ...
Toyota C-HR (AX20) 2023-2026 Owner's Manual
Toyota CH-R Owners Manual
- For safety and security
- Instrument cluster
- Operation of each component
- Driving
- Interior features
- Maintenance and care
- When trouble arises
- Vehicle specifications
- For owners
Toyota CH-R Service Manual
- Introduction
- Maintenance
- Audio / Video
- Cellular Communication
- Navigation / Multi Info Display
- Park Assist / Monitoring
- Brake (front)
- Brake (rear)
- Brake Control / Dynamic Control Systems
- Brake System (other)
- Parking Brake
- Axle And Differential
- Drive Shaft / Propeller Shaft
- K114 Cvt
- 3zr-fae Battery / Charging
- Networking
- Power Distribution
- Power Assist Systems
- Steering Column
- Steering Gear / Linkage
- Alignment / Handling Diagnosis
- Front Suspension
- Rear Suspension
- Tire / Wheel
- Tire Pressure Monitoring
- Door / Hatch
- Exterior Panels / Trim
- Horn
- Lighting (ext)
- Mirror (ext)
- Window / Glass
- Wiper / Washer
- Door Lock
- Heating / Air Conditioning
- Interior Panels / Trim
- Lighting (int)
- Meter / Gauge / Display
- Mirror (int)
- Power Outlets (int)
- Pre-collision
- Seat
- Seat Belt
- Supplemental Restraint Systems
- Theft Deterrent / Keyless Entry

0.0101